As we always do, we’ll start from the scratch, the very basics. OSSIM is most widely used open source SIM tool. The
appliance is developed by the Alienvault. Other than OSSIM there are lots of
open source SIM like LOGalyze, Kustodian, Prelude etc. But out of these SIM
tools, OSSIM is my favorite. It is much user friendly and very stable with respect to performance and resilience. They also have a very good documentation
center which gives step-by-step instructions and very good community forum to get help
OSSIM vs USM
The USM( Unified Security Management) is
actually the licensed SIM tool of Alienvault, But it got a price. When compared
to other proprietary SIEM’s, USM is cheap. What they give for community, the
OSSIM, only has a very limited features of the USM. So if you ask me to choose between USM
and OSSIM definitely I’ll choose USM. But if you’re really new to the ‘SIEM tech’, don’t want to invest money
just to play around; OSSIM will be the best choice. It is important to
understand the strengths and weaknesses of a tool, before putting efforts in to
it. So I highly recommend you to go
through the following links one-by-one.
Still if you have any difficulty in
choosing the product, let me know in the comments.
Assets and Data sources
Anything that has any IP address can be
declared as an Asset. And if those
assets are sending any sort of logs in to your SIEM, then it is a data source. OSSIM support logs
from databases, syslogs, SDEE, WMI etc. In addition to that we also forward a
copy of the network traffic (SPAN) towards OSSIM. I’ve
seen some Antivirus engines do not support syslogs, but it dumps it’s events in
local database. In such cases we configure the OSSIM to manually login to those
databases and fetch logs at regular intervals.
The OSSIM Platform
Any asset you add into your OSSIM must go
through all of the modules in order to get maximum accurate output from OSSIM.
Asset Discovery
The asset discovery module identifies
assets and commonly known ports. It has the capability to do it both actively
and passively. The main idea is to keep an asset inventory for OSSIM
Vulnerability Assessment
The OSSIM has a built in feature to
identify vulnerabilities. It uses the openvas scanner for it. We can execute
both authenticated and un-authenticated scan towards a network or host.
Intrusion detection
It constitutes three parts the NIDS
(Network Intrusion detection), HIDS (Host Intrusion Detection) and the FIM
(File Integrity Monitoring). The OSSIM use IDS tools like Snort to identify network traffic
based anomalies and Suricata for web traffic based anomalies (SQL , XSS).
The OSSIM has a built in OSSEC server for HIDS and FIM
Behavioral Monitoring
It is here where the anomalies in network
traffic are analyzed. In addition to the NIDS module, the OSSIM has built in Netflow in it. It
helps us to identify the cause behind the “sudden spike in network”, spreading
malware etc. The OSSIM also has a feature to do both host-availability and
service availability monitoring. The host availability monitoring checks
whether the marked host is up or not, while the service availability monitoring
checks whether a particular service running in a machine is up or not. It comes
very handy when fighting DOS attacks.
Security intelligence
Here is where the entire computation/processing of events is
done. All of the information which OSSIM grabbed from all of the above modules
will be taken for risk assessment. The core processing stuffs like relating
similar or chained events (correlation) is done here. Here is the one of the biggest
limitation in OSSIM. It only got around 80-100 correlation rules while on the
other hand, USM has 2000-3000 rules. Correlation is the real automation that
helps us to identify attacks. Creating custom correlation is possible in OSSIM. But still when comparing 2000+ rules in USM with 80+ rules in OSSIM, definitely USM winds. Correlation actually gives us answers to questions like, did somebody tried to exploit a
known vulnerability. Do we have a zero-day attack etc?
Architecture
The OSSIM constitutes three devices. But since it
an ‘ALL-IN-ONE deployment’ you don’t need to worry about configuring each and
every module individually. But it is very necessary that we understand the
working properly. The Sensor is the very first thing that comes in contact with
the logs. It does all those asset
discovery vulnerability assessment, threat detection, log collection etc. for you. It collects
all those logs/information it received and converts it into events. The server actually processes those
events sent from a sensor, and does things like correlation, risk calculation,
pattern recognition and behavioral analysis and also checks with the threat
intel feed. The Logger is where the logs are finally stored. The logger
compresses, digitally signs the logs and stores as long as you want, with
respect to your retention policies. But in OSSIM the log retention is not
available. If you want to know more about how processing the logs are done, I
would recommend you to go through
Minimum Requirements
Since both the USM and OSSIM servers share
common design and system services, I recommend we stick on to the requirements
for USM to deploy OSSIM
- 8 CPU cores
- 16 Gb RAM
- 1 TB of HDD
- 3 Network Interfaces
- VMware or Hyper-V
- OSSIM ISO file
- OTX key (I’ll guide you on how to get it)
Even though it supports both VMware and
Hyper-V, I highly recommend using VMware for your installation. You can
download the latest ISO of OSSIM from the following link
Also you may need to open few ports in
firewall in order to OSSIM to work properly please find the list in the
following link
Planning the deployment
Once you have all of those in hand, we need to
plan the deployment. And if you are really concerned about security and ready
to invest time, resource and money, then the very first thing you want is a
checklist. Yes, a checklist with all your expectations from your ‘SIEM tool’ in
it. Then with respect to your budget and requirements you can choose a SIEM.
Once you’ve chosen the product you want, you need to choose a precise position
to place it. It should be a center point where you can have access to all
devices and systems.
So
here is my deployment plan
There are lots of things to be considered
while deploying a SIEM. Things like EPS (Events Per Seconds), assets, bandwidth,
geographical boundaries, time zones and storage etc. if you are planning for an
USM-SIEM. Alienvault offer around 4
types of deployment modes. But since OSSIM is a single tier, AII-In-One deployment, we only need to consider few things.
So the first thing we consider is the scope. Scope is simply a boundary on how much of
assets will be integrated with your SIEM.
Here, my plan is to integrate the firewall, sw2-switch, linux and
windows server. The OSSIM is actually a Debian OS which we install just like an
OS. We need three physical interfaces to set it up (It works on single
interface, but I recommend three interfaces). The interfaces are;
- Management interface
(192.168.1.100)
- Log collection and scanning
(10.10.10.100)
- Network monitoring (Promiscous
mode, No IP address)
Let’s install OSSIM
So I have my virtual machine configured as said before and
it is ready to receive a fresh installation of OSSIM
I’ve given 16 Gigs of RAM, 8 CPU, 1 TB of
HDD and of course three interface as we discussed before. I’ve also loaded the
OSSIM’s ISO image which was uploaded to my ESXI server. Apart from this you
should also configure the ESXI to take span from the third interface and supply
it to the OSSIM. For that please follow the link
Once you’re all set, it is time to power up
the virtual machine and open it’s vm console.
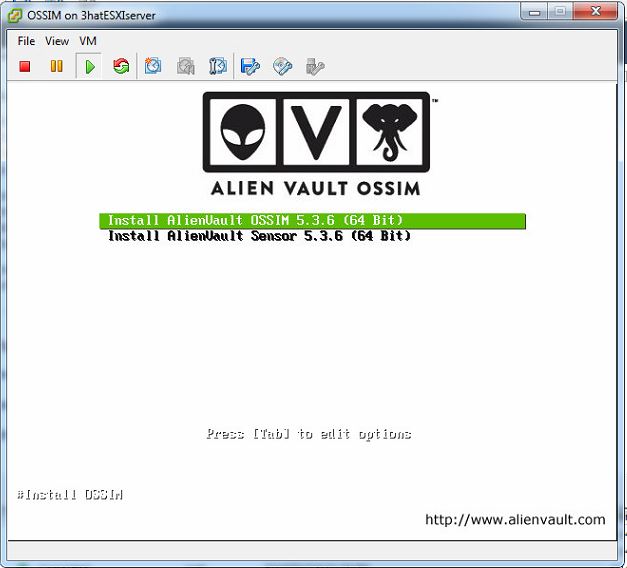
The very first screen(fig.1) will ask you, whether
you want to install it as a sensor or AIO. So select the first options and hit the
“Enter” key to continue.
 |
| fig.1 |
Select the language you want(fig.2), I selected
English, the default one. And hit continue to initiate configuration of the
management interface
 |
| fig.2 |
I
have configured the IP address, subnet mask, gateway and DNS (fig.3).
 |
| fig.3 |
You will have three passwords once you are completely done setting up the OSSIM.
Here we are configuring the CLI/SSH
password for OSSIM(fig.4).
.
 |
| fig.4 |
I have let the timezone has default as shown(fig.5). We can change it later.
Once you hit “Continue the installation
will begin
 |
| fig.5 |
The installation alone takes lots of time(fig.6). In my
case it took around 40 mins to get completed. So you need lots of patience. It
may look not responding but please wait for it to complete.
 |
| fig.6 |
Once the installation is complete, it
reboots itself and you’ll get a screen in vmware console shown below (fig.7) with management IP we configured before. In my case it is 192.168.1.100
 |
| fig.7 |
Let’s configure the OSSIM
Once the installation is done open your web
browser and navigate to the management IP. (Disable any Ad-Blocker if you’re
using any, some javascript may not work.) The browser may throw a warning
saying the site is not secure, SSL not valid etc. Just accept those warning and
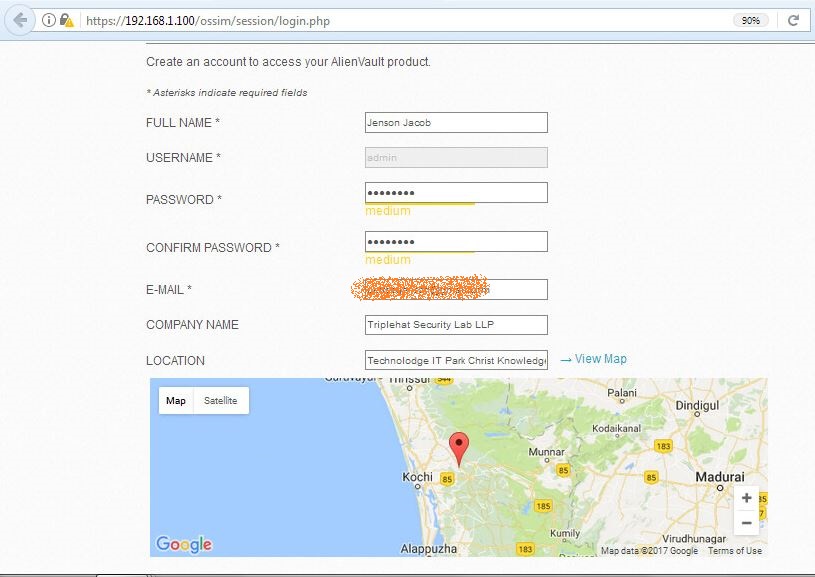
continue to the site. The very first thing we have to do is fill a small form
as a shown in following screenshot(fig.8). Here it asks again for a password, the second one. Here we're giving password for the webui.
 |
| fig.8 |
Once you continue from the form, you'll be welcomed with a login page(fig.9). The password you give here is the password
for admin (created just before) to login into webui.
 |
| fig.9 |
Once you login you’ll be redirected to the
configuration page. A popup box appears first simple
click next to continue (fig.10).
 |
| fig.10 |
As you can see, there are 5 steps here.
Starting from” network interfaces” to “join OTX The only thing we need to
configure now is the interfaces and OTX (fig.11). We’ll leave the rest to default.
According to our deployment planning we’ve already configured the management
interface at the time of installation. The eth1 and eth2 has to be configured
now. Click on the drop down next to eth1’s, under 'purpose' and select “log collection and
scanning”. Same way choose eth2 to be “network monitoring. If you've planned for single interface deployment, then there nothing for you to do here. Just skip to the last stage. You can later configure your single interface to monitor traffic and receive logs. And there is huge drawback for this kind of deployment. The interface will experience a congestion (bottle neck) as more span and logs flow in.
 |
| fig.11 |
”
You’re configured interface may look like
this (fig.12)
 |
| fig.12 |
Now you can simply hit continue unit you
reach the 5th step. While moving from step 2 to step 5 it may show
errors like no assets found, no network devices found etc. Don’t worry about
any of those errors. Simply proceed to the 5th step
.
To complete the 5th step we need
an OTX key. OTX (Open Threat Exchange) is the community threat intelligence
platform. We need a unique key to receive update from the OTX. Inf you don't have an account in it, you need to register in to OTX using the following URL.
Once you login, you will welcomed with all those latest OTX feed in the dashboard(fig.13)
 |
| fig.13 |
After you login, look at the right top corner(fig.14). You can see a small wheel. Click on it and when the drop down is shown select settings as shown below
 |
| fig.14 |
Then scroll down a little bit in the
settings menu and you’ll see your OTX key(fig.15).
 |
| fig.15 |
Now you should copy the entire key. But
care must be taken for not copying any whitespace before or after the key. Then
get back to your OSSIM webui and paste the key there(fig.16).
 |
| fig.16 |
After pasting the key proceed to the next
window. First you’ll have popup asking to configure more data sources or
explore OSSIM. Choose the option to explore OSSIM(fig.17).
 |
| fig.17 |
You’ll be see a brand new
dashboard of OSSIM(fig.18). Feel free to navigate around.
Next job is to integrate devices and servers/systems. I’ll show that on my next article. I highly recommend taking a VM
snapshot of what we done so far. If you’ve have any questions please let me
know in comments below. Till then stay tuned, subscribe, follow and support.
Click here for the part 2


The Certified Authorization Professional (CAP) certification identifies enterprise system owners and security officers who authorize and maintain information systems, with a focus on balancing risk with security requirements and countermeasures. The CAP credential is aimed at the private and public sectors, including U.S. federal government agencies such as the State Department and the Department of Defense (DoD). Achieving the certification helps DoD personnel comply with the 8570 Mandate.
ReplyDelete
ReplyDeleteGoood Working...Thanks for shairng keep it up!
SketchUp Pro Crack
IStripper
Audacity Crack
Geekbench Pro
Maltego Crack
Hello world!
It is very informative. Very easy to understand. Great work team. Keep me updated for all such articles. I am highly grateful to you for sharing useful information with the users
ReplyDeletethis is amazing site thanks for sharing!
Winstep Xtreme Crack
HyperSnap Crack
iDevice Manager Full Crack
NetFlow Analyzer Enterprise Crack
CyberLink Photodirector Full Crack
DriverMax Pro Full Crack
internet download manager crack is a vector graphics editor program.
ReplyDeleteI am very impressed with your post because this post is very beneficial for me and provide a new knowledge to me
ReplyDeletesoftcrack
softcrack
softcrack
softcrack
softcrack
gurucrack
gurucrack
gurucrack
gurucrack
gurucrack
I like your all post. You have done really good work. Thank you for the information you provide.
ReplyDeleteGetcrack.co
PhpStorm Crack
NordVPN Crack
PassFab For RAR Crack
FlixGrab Premium Crack
Drip Fx VST Crack
I like your all post. You have done really good work. Thank you for the information you provide.
ReplyDeleteXCrack.org
Grids for Instagram Crack
Nero Platinum Crack
FL Studio Crack
Luxion KeyShot Pro Crack